找回密码
 注册
楼主: 木匠乙

[设计] 得伟 DW618 雕刻机 说明书中文翻译

  [复制链接]
 楼主| 发表于 2009-6-5 17:57:21 | 显示全部楼层
DW618我有一个问题,不知道那位前辈能帮我解答?" x! i$ {( D* `! |+ b

/ f' a3 h4 a7 G0 M' N: P! U问题就是怎么才能让雕刻机升出的刀头长一点?$ r1 p: d8 l5 K  x* l, n

' M  k+ ~4 f  P/ T) s我的618,我不知道怎么调整,每一次需要吃木头比较深一点的时候,就要用劲压,就算是用劲压,也只能吧刀头升出去 ...
  s  G. C) G/ A& @( Q: t8 W山林布衣 发表于 2009-6-5 17:16
4 F6 X2 [/ L; b9 f0 O+ c9 f

6 w: d2 `" ~6 B) k/ A. A' p" o你的雕刻机的底座是哪一个?5 i+ w3 v; o; I
如果是下面这个,后面会讲道深度的调节。
! [4 U' X- |  w7 D& P/ u, T
: J: @4 w3 C% R. a
+ m; g3 d" T) z0 H  H! ~ Plunge Base.JPG ; x: r2 f8 `/ {+ @, m% a2 W/ p" V
如果是固定底座或者D手柄底座,我可以单独给你翻译关于深度的调节部分。
- i8 ^; q8 b5 h$ g5 ]" R: R% F总之,都是可以调节的。
 楼主| 发表于 2009-6-5 18:02:56 | 显示全部楼层
DW618我有一个问题,不知道那位前辈能帮我解答?
1 T0 A. k& g6 S4 l" D/ S2 o3 g% Y2 X+ z9 T
问题就是怎么才能让雕刻机升出的刀头长一点?
1 D" J6 k% l" c3 }) Z% `  ^* t0 E1 Z$ N- u4 ~6 ]2 P8 p$ B* ^
我的618,我不知道怎么调整,每一次需要吃木头比较深一点的时候,就要用劲压,就算是用劲压,也只能吧刀头升出去 ...) {) q$ `( p& Z% u, v: i# r
山林布衣 发表于 2009-6-5 17:16

7 [1 o. J" j! W1 w! O
7 N: B" m& k7 W8 }/ Y7 a
4 l4 e6 a. Y0 K% M# o6 b3 E2 q
% }1 ~- P+ Q* x/ D; _如果你已经做了相关的调节,就和你的刀本身的长度有关系了。' K  M6 r) e; a8 m5 R7 ?
如果刀长只有2cm,夹头压下去到工件的表面也就为止了。
4 c  ~$ K" ]9 O根据我使用过程中的观察,夹头一般是可以压到木头表面的。
 楼主| 发表于 2009-6-5 18:06:01 | 显示全部楼层
本帖最后由 木匠乙 于 2009-6-5 18:50 编辑
' Y8 K8 E( B; @9 B) f8 r. q: R/ |) o/ n: N5 Y
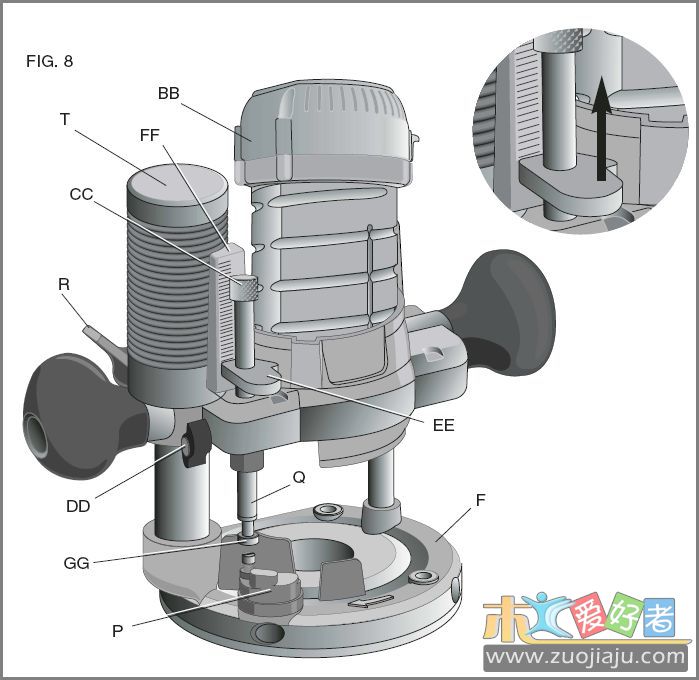
Inserting the Motor into the Plunge Base 5 W0 G: |+ x+ d; z
装电机; `9 m* C- n4 {6 B9 g4 ]9 I
(参考图-8)! I2 p- N5 h; g; t& p
7 Y, f1 Z1 d# `$ h) ?6 z
  A$ ^" l. j9 c
CAUTION: Turn the router off and disconnect it from the power supply. : K$ L# c4 ?0 Q# O: h% j& d5 l
注意:关闭开关,拔下插头。/ [) x7 E3 ~$ g% u0 \! z

, B  e/ b3 e4 n5 k1. Remove the depth adjustment ring from the motor. It is not used with the plunge base. 4 W1 z' v. v6 U/ w( l
取下电机上的深度调节圈,它不用于垂直可调底座。
# o7 U  u& j  ?: i
) f+ I9 N; Q& |7 g" R2. Open the locking lever (D) on the base to ensure that the motor properly seats. $ c. E8 N% m/ k
打开锁定杆(D),确保电机可以正确就位。$ d8 T& D# Y3 D4 d
(在图-8中看不到底座的锁定杆,锁定杆在背面)" T" N( p/ t. b# E; O/ a/ w
# o5 {3 @$ Z4 `; V
3. Ensure that the plunge lock lever (R) is locked.
8 d% {; b5 l8 `! [确认垂直可调底座的升降锁定杆为锁定状态。2 ^7 G8 d6 V' @  |' u! E; @2 E8 _
  X; y* \* R- F  [+ Q& y5 A
4. Align the flat of the motor’s end cap (BB) with pillar (CC) and insert the motor into the plunge base until it stops.
+ H1 I' U+ W; ?3 x* C- r电机端盖的平面(BB)和柱(CC)平行,将电机插入底座,确认到底。
! I- {0 C) i. j; _
1 b: `; [. [) }5. Close the locking lever (D).  N  z/ b4 s* p
关闭锁定杆(D)。
 楼主| 发表于 2009-6-5 18:53:34 | 显示全部楼层
本帖最后由 木匠乙 于 2009-6-5 19:04 编辑
% C! g% u$ z1 _; s
' ]/ k; B; C  o1 ~5 l/ B$ ]1 d! j; L: |Locking Lever Adjustment (Fig. 4)* f% N! {- p5 k( c5 t- q2 T
锁定杆调节(图-4)2 D0 n" D. J, k4 t6 x7 \* g
- `- W" y  d( F- f; i/ t
CAUTION: Turn the router off and disconnect it from the power supply.7 H3 U  N" f1 c( g0 z3 D  l
切记关电源,拔插头。

7 u  |% j. J  C) p3 b, f' X- r1 E' U4 T" R+ o; \8 G
You should be able to clamp the locking lever without excessive force. Excessive force may damage the base.
( D) k* Q5 [+ \" v, b锁定杆不用太过使劲就可以扳动,太用力会损坏底座。
6 F( o+ x. J* U4 P
! M5 T( W+ a; |1 A9 S% l' `You should not be able to move the motor in the base when the locking lever is clamped.
6 V" p9 s3 r  k锁定杆锁住状态用手应该无法移动电机。(说其力道)1 R5 ?% O! b& u9 F, x, v

4 v- m, O, [2 \7 C5 |6 j- lTo adjust the locking lever’s clamping force, open the locking lever (D) and turn the nut (Y) in small increments. Turning the nut clockwise tightens the lever, while turning the nut counterclockwise loosens the lever.
, G6 g/ k, j" K& p3 l+ ~2 W3 h调整锁定杆的夹持力可以松开锁定杆(D),略微调整螺母(Y),顺时针紧,逆时针松。
图 -4.JPG
发表于 2009-6-6 01:24:58 | 显示全部楼层
关注中……,楼主E问不错嘛!
发表于 2009-6-6 08:57:46 | 显示全部楼层
认真看!
 楼主| 发表于 2009-6-6 12:07:06 | 显示全部楼层
本帖最后由 木匠乙 于 2009-6-6 12:26 编辑
: g6 p2 y5 I- |# X  j% ~1 ~) U+ V* A! P7 g5 B. d1 K* x
Centering the Subbase (Fig. 5)
1 ^" d8 `# M2 [; v座垫对中(图-5)" d, K+ q8 V0 W

9 U2 x/ Y6 B5 w: ^CAUTION: Turn the router off and disconnect it from the power supply.
4 _  r5 _5 z% b8 R+ ~  `- v. q4 z切记: 关开关,拔插座.
# h$ T7 @/ \( C; T  ?) Q. }+ Y. i2 i, @7 v/ `; Y1 s2 J( e
If you need to adjust, change, or replace the subbase, a centering tool is provided. The centering tool consists of a cone and a pin. To adjust the subbase, follow the steps below.
3 r+ a  ], F* I" F" V调整或更换座垫,可用随机所带的对中器,该对中器包括一个小棒和一个漏斗。具体步骤如下:
: c2 e+ m2 i* ]' a" t0 q) {2 \2 L) j0 S% o- n7 _8 v5 O$ O
1. Loosen but do not remove the subbase screws so that the subbase can move freely.7 w% M% E7 J8 Y5 j
松开但不要取出座垫固定螺丝,座垫活动了即可。
! y. m: p: V$ T4 h' E/ R: `, A  |5 N/ E& P) N3 E
2. Insert the pin into the collet and tighten the collet nut.7 z2 m% T1 i! a' E9 p2 N
把小棒插入夹头,拧紧夹头螺母。; O9 {, H+ I3 b$ ?9 M
8 Y, d1 ~5 i8 r5 |' c9 {
3. Insert the motor into the base and clamp the locking lever on the base.
, t, q+ d4 y. o
把电机插入底座,锁定杆锁紧。
  q) r% y3 u; T  ]' d+ L' T: M
2 d; L. P- O. U" }4 Z2 }4. Place the cone on the pin and lightly press down on the cone until it stops as shown. This will center the subbase.

: T1 }  S# [! y" ?7 k把漏斗如图套入小棒,轻轻压下,直到压不动为止,座垫也就对中了。! w5 q1 y/ g9 `, D9 p) I; \. X# x
% j. O$ o+ W1 H6 }. u: ~
5. While holding down on the cone, tighten the subbase screws.
* W  K% @# R0 A1 V$ {) t
用手压住漏斗,拧紧座垫固定螺丝。; g5 `& \& L: o& f" S- C
: C( `% j: ]5 G6 v% X

$ u* a  Y5 H( X7 ?" p; ^9 f/ B4 t6 o- K" Y
图 -5.JPG
发表于 2009-6-6 12:13:19 | 显示全部楼层
认真学习 lz
 楼主| 发表于 2009-6-6 12:29:07 | 显示全部楼层
本帖最后由 木匠乙 于 2009-6-6 13:00 编辑 8 h8 T8 x6 ~$ u

( k/ O5 r; c' @: n- l& U3 E1 fOPERATION: PLUNGE BASE) e! j% [+ B) p* B3 A. _3 i2 x
操作:垂直可调底座
( A+ w/ m$ V) y* K
$ [- {: u$ U; T7 Z' F$ ]. |
Bit Installation and Removal (Fig. 6)6 u7 d% [( h; I5 [7 g; x9 q
刀头的装卸
5 p2 h- [" u$ e# {/ v
& A: N% d2 h1 u% ]6 ?CAUTION: Turn the router off and disconnect it from the power supply." U8 T, e' K4 p* G% G* o! E
切记:关电源,拔插头。
" J$ ~  y! e# S; ]4 _  W* m" o8 x
7 d) ?5 g- ?% B- N+ C( J9 J1. To install a bit, insert the round shank of the desired router bit into the loosened collet as far as it will go and then pull it out about 1/16". Using the wrench(es) provided, turn the collet nut (J) clockwise while holding the spindle shaft with the second wrench. [On the DW618, depress the spindle lock button (I) to hold the spindle shaft.]: d. I' {0 h( E3 v7 k* r( h
装刀头:松开夹头螺母(J),把刀头尾部圆杆插入夹头并到底,然后拔出1-2mm,先用手拧紧夹头螺母。按住轴锁按钮(I),转动夹头直到轴锁锁住轴杆,这是用随机所带的扳手顺时针拧紧夹头螺母即可。) a4 [* A, r' T
6 ?0 N0 m+ L/ @9 r  d; L
2. To remove a bit, hold the spindle shaft while turning the collet nut (J) counterclockwise with the wrench provided. [Hold the spindle by depressing the spindle lock button (I) on the DW618.] The self-releasing collet nut will turn approximately 3/4 of a turn and then become tight again. At this point the bit cannot be removed. Continue turning the collet nut counterclockwise. This lifts the collet, allowing the bit’s removal.
* a. ^/ S& q, a2 o卸刀头:按住轴锁按钮(I),转动夹头螺母直到轴锁锁住轴杆,用扳手逆时针转动夹头螺母约3/4圈,这时自释放夹头螺母又变的稍感吃劲,此时不可拔出刀头,继续逆时针转动螺母,即可自行释放刀头,轻松拔出。
0 \: l$ Q2 C8 f
! I1 |7 n) D: Z3 k
图 -6.JPG
 楼主| 发表于 2009-6-6 13:02:49 | 显示全部楼层
本帖最后由 木匠乙 于 2009-6-6 13:12 编辑 - J6 E5 F0 @( @  x8 A5 S7 T0 o0 c

$ a) P( M3 }9 `0 k, j' T: v  b5 FCollets 夹头0 B: g4 v+ t: z! e- y5 K1 O
( R' C& c# z/ L' s+ i. |. h8 W5 x
NOTE: Never tighten the collet without first installing a router bit in it. Tightening an empty collet, even by hand, can damage the collet.- q& v. M& D1 U! G" A% [* C
说明:决不可无刀头状态拧紧夹头。无刀头时,即便用手拧紧夹头,也可能导致其损坏。! S9 N. @$ D+ q* w

, h- {( j) Z4 _+ a! Y7 X6 `Two collets are included with the motor: one 1/4" and one 1/2". To change collet sizes, unscrew the collet assembly as described above. Install the desired collet by reversing the procedure.The collet and the collet nut are connected. Do not attempt to remove the collet from the collet nut.0 V" }" P4 D1 ?
随机带有两个夹头:一个1/4英寸,一个1/2英寸。换夹头很简单,拧下一个,拧上另一个即可。夹头的夹持部件和夹头螺母是厂家特定工艺松套连接一体的,不要尝试分开它们。
 楼主| 发表于 2009-6-7 13:12:37 | 显示全部楼层
沉的没影了
1 g- }, h) ]+ y( Q$ |1 c9 x先找到
 楼主| 发表于 2009-6-7 13:17:27 | 显示全部楼层
本帖最后由 木匠乙 于 2009-6-7 15:11 编辑
5 D0 q$ H/ N( I7 n2 |0 t" f* b, x$ W8 l
Adjusting the Plunge Routing Depth (Fig. 8)
& k; x1 w. D- i9 ]- G垂直可调底座的调节$ k& t+ ?( f8 i

- W& m( y$ R; q) i7 t  ]6 rCAUTION: Turn the router off and disconnect it from the power supply.
' T1 N! ]6 c8 }7 f1 F5 {# r  J切记: 关电源,拔插头。
8 ]8 [# L$ x7 P/ c: p, A1 L5 X- M: e& D) n
1. Unlock the plunge mechanism by pushing up the plunge lock lever (R). Plunge the router down as far as it will go, allowing the bit to just touch the workpiece.
! D0 h5 r+ z9 L" Q+ B向上推垂直调节锁定杆(R)松开垂直调节系统,将雕刻机本体向下压到底,使刀头刚好接触到工件表面。- l3 V8 O+ A. X$ D/ A
0 z$ e2 Z  a; |( b, n9 x
2. Lock the plunge mechanism by pushing the plunge lock lever (R) down.
1 B! Y0 F3 ~$ r% h向下推垂直调节锁定杆,锁定垂直调节系统。6 E7 U) E/ W2 a9 I
$ S# H6 H* H$ E! k- n, v
3. Loosen the depth adjustment rod (Q) by turning the wingscrew (DD) counterclockwise.2 c. [& W$ N, ?# S+ V( F
逆时针拧锁定螺丝(DD),释放深度调节杆(Q)。$ h1 ?- i, I6 T/ g2 [, A

: ]1 a# P: b) i4 h0 i* T4. Slide the depth adjustment rod (Q) down so that it meets the lowest turret stop (P).5 \3 E; |# ]; o9 g- {
滑下深度调节杆(Q)使其接触最低的限位座(P)。0 @3 f  t. Y: K
  W: f/ }2 L, V
5. Slide the tab (EE) on the depth adjustment rod down so that the top of it meets zero on the pillar scale (FF).
' @- `3 F" Z5 [滑动定位片(EE)使其顶面对正柱形尺(FF)上的0位置。( t; W0 u9 D+ r; t9 N

: B4 G$ R! ^6 f, O% @' [6. Grasping the top, knurled section of the depth adjustment rod (Q), slide it up so that the tab (EE) aligns with the desired depth of cut on the pillar scale (FF).0 w( f- A, R9 L; ]
9 R$ C2 p. @  a3 W* ^

5 P- k  p& S/ I0 Q( t+ `  A' G7. Tighten the wingscrew (DD) to hold the depth adjustment rod in place.  @' G) M& {4 e
8. Keeping both hands on the handles, unlock the plunge mechanism by pushing the plunge lock lever (R) up. The plunge mechanism and the motor will move up. When the router is plunged, the depth adjustment rod will hit the turet stop, allowing the router to reach exactly the desired depth.
图 -8.JPG
 楼主| 发表于 2009-6-7 15:44:16 | 显示全部楼层
本帖最后由 木匠乙 于 2009-6-7 15:45 编辑 0 V. }; @3 |- C- S! f4 ~3 s- R; c
) i3 U" G  S1 s1 U
因超时不能编辑而重发
) g3 Z  s0 a( u5 M) m8 }  A
0 @& g9 {! M( d4 Z3 F! K0 g" tAdjusting the Plunge Routing Depth (Fig. 8)( v( D. G2 ?% I, G
垂直可调底座的调节

4 q: i/ S9 @4 M, J' Z5 i  v* D" G
  Y7 o. B7 M8 q4 jCAUTION: Turn the router off and disconnect it from the power supply.9 s0 U" _& \, G1 l/ k2 `: x3 d
切记: 关电源,拔插头。
: u, ]5 n# ?( q. a! I, N/ \. R( \# F
( R. @: d$ q, B7 K3 v
1. Unlock the plunge mechanism by pushing up the plunge lock lever (R). Plunge the router down as far as it will go, allowing the bit to just touch the workpiece.& c3 N$ q  |; R7 r2 X
向上推垂直调节锁定杆(R)松开垂直调节系统,将雕刻机本体向下压到底,使刀头刚好接触到工件表面。
8 m+ l9 g( J$ R7 R: [7 q' @
( b* j! T2 @, y' y) c, D
2. Lock the plunge mechanism by pushing the plunge lock lever (R) down.  o4 z9 T; ^# U' _* f# t2 D
向下推垂直调节锁定杆,锁定垂直调节系统。
8 i7 u& L3 ]8 o! s6 @, M3 O& X
. _) {; L. a7 {' n, i3 x( c
3. Loosen the depth adjustment rod (Q) by turning the wingscrew (DD) counterclockwise.8 s! e6 F! T  G% P0 e' @/ h
逆时针拧锁定螺丝(DD),释放深度调节杆(Q)。

  T, C5 A" I- I! N' i4 Q" |1 L6 S; D/ \' b# R0 U  {5 e* n+ @7 ~
4. Slide the depth adjustment rod (Q) down so that it meets the lowest turret stop (P).
+ \8 S! x7 D0 V/ f4 W滑下深度调节杆(Q)使其接触最低的限位座(P)。

& @5 s( J! F% O7 ]; `2 y- Q% G$ F0 S: l( v& z
5. Slide the tab (EE) on the depth adjustment rod down so that the top of it meets zero on the pillar scale (FF)./ q5 }9 d, n& I& N) {% J. |
滑动定位片(EE)使其顶面对正柱形尺(FF)上的0位置。
5 k6 {  U5 ^6 x5 {% p9 ^
( R- G% X2 \) k) N
6. Grasping the top, knurled section of the depth adjustment rod (Q), slide it up so that the tab (EE) aligns with the desired depth of cut on the pillar scale (FF).
; |7 s* g' j+ X! j4 A$ _7 A2 L抓住深度调节杆(Q)的顶部,向上抽,使定位片(EE)的顶面对正柱形尺(FF)上希望的切削深度。
% g% @" m) j7 a, z% Z0 r
. {  |& Y# \! i* e
7. Tighten the wingscrew (DD) to hold the depth adjustment rod in place.
3 F, r  k1 L, g旋紧锁定螺丝(DD)将切割深度定位.
/ ?8 w8 e' V- R$ n6 z/ F, z

% V! q% N) F  H' v8. Keeping both hands on the handles, unlock the plunge mechanism by pushing the plunge lock lever (R) up. The plunge mechanism and the motor will move up. When the router is plunged, the depth adjustment rod will hit the turet stop, allowing the router to reach exactly the desired depth.( q; C; `; D, x6 |& P1 h; }# H& j
双手握手柄,上推垂直调节锁定杆(R),解除垂直调整系统的锁定,垂直可调系统和电机会上行。% z5 X! s# Z: e  Z
下压时,深度调节杆(Q)会遇塔形限位器(P)而停,此时刀头恰好到达预定的切割深度。
7 X0 c+ L+ ^# O+ k" T' Z

4 u" O) j" T) g. K9 h! G9 u
( o2 `0 W( Z1 t' y. ]+ {5 G4 h
图 -8.JPG
 楼主| 发表于 2009-6-7 21:12:57 | 显示全部楼层
本帖最后由 木匠乙 于 2009-6-7 21:26 编辑
/ K) r8 \6 G  k' K5 X. Z8 n: w! G7 L0 o" [8 l
Fine Adjustment of Routing Depth
" _0 I( R$ g) j- T! J' }; v切割深度精调
+ S0 m( O# h/ h# O) Y  A4 z) w( X& _0 r
CAUTION: Turn the router off and disconnect it from the power supply.
; V. R9 Q1 @7 P$ x7 G: n" y
切记:关电源,拔插头。( C) H! L- ~# E% ^0 W

) ^% F8 p3 N1 I. \0 a& mThe knurled knob (GG) at the bottom end of the depth adjustment rod can be used to make minor adjustments.

  ^7 T& G2 [( w% A- ?, W用深度调节杆底端的滚花柱头可以做细小调整。
4 I9 E# c3 C7 V2 A: k' o+ l+ y6 S: k2 H* V4 @1 p5 N6 |6 W
1. To decrease the cutting depth, rotate the knob clockwise (looking down from the top of the router).
* J" n( G7 Q) i0 S1 s7 v+ ?调浅顺时针(从上往下看时)转动滚花头。4 C6 U3 W; b# q' S% O6 t& u  ~

! B$ h7 b) H2 C6 ?
2. To increase the cutting depth, rotate the knob counterclockwise (looking down from the top of the router).
6 V3 X5 P6 y9 O+ M  K; d3 ]调深逆时针(从上往下看时)转动滚花头。6 x8 b. o' q5 T9 @; U0 R

5 H" \9 `, a  \# j: B; ^NOTE: One complete rotation of the knob results in a change of about 5/128" or .04" (1 mm) in depth.

' _% @7 v+ s3 U说明:滚花头转一周深度变化约5/128“ 或 0.04" (1mm)。
 楼主| 发表于 2009-6-7 21:29:29 | 显示全部楼层
本帖最后由 木匠乙 于 2009-6-7 21:46 编辑 ; N4 i6 \/ ^( u' @/ }' l0 c, _2 b

1 E. B+ t$ W) V4 V! @Using the Rotating Turret Stop (Fig. 9)+ ?# ~2 v& n$ S( `5 k- c+ p
使用旋转塔形限位器0 _0 ?; f+ R- d* K' g, v6 r

9 D2 L2 }+ R3 D- kThe turret depth stop can be used to set 5 different depths. One of the turret stops is adjustable.
$ o2 k* k& `9 Y
塔形限位器可以设定5种深度,其中之一是可调的。
" Z0 D6 r9 D: g9 q! y8 L2 m! J- M, U3 {, d
( w% y) R3 D/ ], u1 I6 O: E# X
To use the adjustable turret stop, loosen the nut (HH), then adjust the screw (II) to the desired height. Turning the screw counterclockwise will raise the screw which will decrease the cutting depth. The turret stop is useful for making deep cuts in several passes.

0 I$ j& i; c" X9 j* @可调塔形限位器的使用:松开螺母(HH),调节螺丝(II)至需要的深度。. d0 d: S6 W- z" Y2 u0 D
逆时针转动螺丝会升起螺丝,减小切割深度。' Y8 A2 Y. Q  O6 g( d
(最后这一句不知道怎么翻译 The turret stop is useful for making deep cuts in several passes.)
1 N7 A, Z# Q9 p- [9 g3 `
' u" E1 F' x% O* n+ DWARNING: Do not change the turret stop while the router is running. This will place your hands too near the cutter head.
0 M5 M# P* s$ w警告:雕刻机还在运转时不得调整塔形限位器。手距离刀头太近了。$ m6 o% ?3 u2 k! Y1 L
图-9.JPG
您需要登录后才可以回帖 登录 | 注册

本版积分规则


快速回复 返回顶部 返回列表