找回密码
 注册

快捷登录

楼主: piggybac

做全套樱桃木的美式橱柜(piggybac木工房)

   火... [复制链接]
 楼主| 发表于 2011-10-6 03:47:23 | 显示全部楼层
再来一个全家福,门框边都在这儿了。% S) G  E1 x* I3 V% I6 p
/ p) ]/ y/ z% F6 z1 Q" i
IMG_2952.JPG
2 @. h" q+ K$ Z3 O
 楼主| 发表于 2011-10-6 03:51:16 | 显示全部楼层
对了,还有上下边框的侧边也需要掏槽,不过要换一个互补的刀头。这次用上了我上次作的专门做这个的jig,在实用中稍微作了一些改进,现在非常好用,真是事半功倍的效果。# z! K$ p3 l4 Y& i2 @6 U

( _3 ]5 f" C0 A8 m) W IMG_2955.JPG
% Q7 }" w$ a8 ]3 @: H
; S) f0 e$ {( a5 S5 p7 v% [( g IMG_2957.JPG
, u# E3 [# ^: \+ V9 i0 W
 楼主| 发表于 2011-10-6 03:54:39 | 显示全部楼层
本帖最后由 piggybac 于 2011-10-5 14:58 编辑 ( ^+ y% s. A, I0 v
' @; b  A. I$ H3 P  m, _9 n
有了jig,真是又快又好。
2 L# b" A" P* L8 b  g% ^# S% S/ j0 O: t* ^; y$ ~1 I: l
IMG_2958.JPG ( Y  q; d: y- g
1 p8 X8 E6 f/ S
IMG_2959.JPG 0 u) k' s4 l4 X8 D
* H5 x" K% ]" y+ S7 s" A) U& X
IMG_2960.JPG 3 g3 x* W# T$ @8 ?1 ]
6 @+ s9 [0 Y& A1 R6 {
IMG_2962.JPG - B$ l' E8 j% Q

评分

参与人数 1威望 +60 刨花 +160 收起 理由
安家美国 + 60 + 160 继续观战、学习、、、!

查看全部评分

 楼主| 发表于 2011-10-6 04:04:30 | 显示全部楼层
真正难做的是raised panel 的门板,我的雕刻机功率不够大,要过好几遍才能完成一边,而我总共有35个门,还有些是拱形的,可以想象有多大的工作量。所以在开始做raised panel 之前必须想办法来减少工作量。得好好琢磨一下这个问题 。。。。
发表于 2011-10-6 11:53:54 | 显示全部楼层
感觉移动靠山而不是提升刀,改纵向分次为横向分次,效率高,精度稳定。但对曲面板是个挑战。
 楼主| 发表于 2011-10-6 19:22:35 | 显示全部楼层
tokenwing 发表于 2011-10-5 22:53 2 g/ s9 C; C) e7 ?, K3 C
感觉移动靠山而不是提升刀,改纵向分次为横向分次,效率高,精度稳定。但对曲面板是个挑战。
4 e$ U% F) [) p" g$ O" |
谢谢你的建议,我也考虑过,但任然有这么多的部分要切掉,对我的雕刻机来说还是同样的挑战。我在考虑用台锯斜着切掉大部分(我准备做直线斜边的raised panel),但需要用一个辅助的jig来完成。正在想如何做这个jig 。。。。。
发表于 2011-10-6 22:23:15 | 显示全部楼层
piggybac 发表于 2011-10-6 19:22 1 E+ M- P  H1 c% M, ^
谢谢你的建议,我也考虑过,但任然有这么多的部分要切掉,对我的雕刻机来说还是同样的挑战。我在考虑用台 ...

' H; G5 X9 s2 }( b7 {% PGood idea. Here is one example but a bit complicated. I love the 2nd (see p12)
7 N( C$ }4 F% N; N. c5 z) nhttp://www.newwoodworker.com/pnlrasjig.html
; m, h! F9 W1 S& g( i7 E3 |http://tnvalleywoodclub.org/Plans/TablesawJigs.pdf/ c- {  f$ n1 M9 {
& a) @* X  I$ T9 Z
This is really simple:) V# V1 h9 B1 y/ G
: N& I' H( I  b: T5 ~% n
http://www.woodmagazine.com/woodworking-plans/tablesaw/raised-panel-pushing-jig/" z4 u9 U3 z, W. U* r

% C& L& {( S# [8 O3 WI believe all within your searching range :)6 ]2 |* d% F6 ]0 o, j$ G( q7 P* F9 u

, S% y9 ]1 a3 d: m* h(shock, it does not count E as words!)$ a" A8 n7 S, A3 Z9 M

/ ~$ q$ [6 B& e的事哦在
 楼主| 发表于 2011-10-6 23:46:49 | 显示全部楼层
本帖最后由 piggybac 于 2011-10-6 10:48 编辑
# W5 l% p5 T5 ?. K/ L% q$ T/ P
- g% u; W: W4 I9 G2 j" Z' gThanks a lot for those articles. That is very helpful. I am thinking one of the high fence jig, which can be upgraded from my previous table saw jig. I spent some time and rebuilt it, have a test run with scrap wood, it seems very good. Here are some pictures.7 y& r& v3 t9 W9 H3 P

+ \. ]8 S) f& H$ t0 ^/ FThe back support which rides on the fence is actually made a lot time agao, but never got used.
2 y) X6 p0 c2 V+ o0 C IMG_2963.JPG
; u  c0 V5 y( [( t/ R* X* W  f; R8 i7 o# @, ^. l
The front has high fence with clamp down and fence dog (dowel).+ g$ }% A( J( i
IMG_2964.JPG
1 C. t( v! M7 e. c) [3 c* `9 b1 d' ]- l, }/ w" B
IMG_2965.JPG
% K2 l8 N& _9 d0 ~, a, _- K' ?& _  ^, E0 K& K( i1 q
Here is the test run with scrap wood.+ d3 B  n+ Z; h9 s2 k) J
IMG_2966.JPG
2 d5 Y% D) u- U8 Q
$ {0 z9 Z3 P8 \- ?4 P0 Q9 | IMG_2967.JPG " X! E$ T& X+ r1 K! I9 X

: S( K3 p' q+ T# l/ bThe result is pretty good and consistant.% I' h: F$ h9 r
IMG_2968.JPG
' ~2 u3 c0 m. ]; G: U; n. _! G/ D6 u: [7 a: _* {, n! R
IMG_2969.JPG
4 }; V9 w6 N  ]2 ^% k( u+ M# F  d3 C3 d
IMG_2970.JPG 0 \# c# q" w) Y3 A

1 a- |% F+ C  \; @  J: p' _9 H. XBut I still need to improve it during use, like make long arm clamps instead of just the short ones, also the back support on the table saw fence also need to be longer for stability. But right now it is pretty good and solid.
6 n- R4 ?# k; G$ u* y% y$ c( v- y2 T4 F
这个台锯的jig 还需要实践的验证,不过目前还是好用的。
5 x& {! ~1 ~3 p2 U4 y, \
发表于 2011-10-7 00:30:34 | 显示全部楼层
very very impressive! So smooth like silk. Comprehensive design! Is it the one Freud blade with advanced thin kerf? Much prefer to your solution which I am looking forward to currently. Thanks a lot! I love the pattern, simple, straight, solid and more modern elements introduced rather than traditional NA rounding shape . One question, how do you think it matches the frame style finished?
& Y' y$ x7 x, I( I# S3 \3 H/ c1 N, Z: T) v
我注意到已完成的门框都有一段小的圆弧,是不是结构就显得有一点点不统一?
: o3 ?* q/ c* Q8 K: o5 a2 M
7 B4 _3 I. i9 N* L
 楼主| 发表于 2011-10-7 04:56:09 | 显示全部楼层
本帖最后由 piggybac 于 2011-10-6 16:03 编辑
9 d4 O3 I( V7 @6 }; e) k8 e! H5 S9 |9 n% N: O
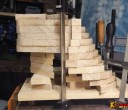
This is only going to be the first step, it is intend to remove most of the material before using raised panel bit to make the final 2 passes. I also see one of the articles which they just use table saw with this kind of jig to do the raised panel, the only difference is that there is no flat edge compare to use raised panel bit, which is not perfect for the stile and raill grove. In fact, I really like the one using table saw, because it is really fast, and you don't have to mess with raised panel bit and router." U& H, y6 p8 M; p6 p; T: a* i1 w

* s- w8 K$ x- F; F8 x( O# R4 bBTW, I did use Freud blade. My table saw is a 10" saw, but it uses universal motor, although it has 15A rating, it is considered as under powered saw. I don't want to reduce the life of the motor quickly, even I do have two good 10" think kerf blades (Freud, Amana), I still prefer using 7 1/4" blade. I got a few Freud 7 1/4" blades from Homedepot when it was on sale for $4.97 + tax which suppose to be used on circular saw, and found that these blades were absolutely wonderful and happy on my 10" saw. It cuts the wood like butter, and will never slow down my saw. So most of the time, I will use this saw, especially when ripping the wood.- A" J1 M) Q" H7 F
, e4 m0 o8 C* {
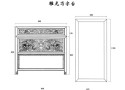
门框的横边与竖边之间用的是完全互补的刀,因此相互是吻合的,等到安装时就能看出来。
2 e; A6 E& e/ V9 i6 \
发表于 2011-10-7 10:25:51 | 显示全部楼层
很好很好,又开工了,手有点生了
 楼主| 发表于 2011-10-7 19:23:17 | 显示全部楼层
我这一辈子 发表于 2011-10-6 21:25 # p7 F+ @2 M+ }! y0 r) F7 q5 O/ Q
很好很好,又开工了,手有点生了
1 z" Q+ E" J' Q, ~( T
不好意思,是啊是啊。赶快补起来 。。。
发表于 2011-10-7 22:23:39 | 显示全部楼层
等待中。。。中。。。
 楼主| 发表于 2011-10-8 08:06:18 | 显示全部楼层
又做了个长的压板,然后开始用jig来锯门板了。2 [1 |1 b! u5 F, x
, Y% B+ s  O; g
IMG_2971.JPG ) a' L" M3 V* O5 E0 o

# n+ \7 P' }$ E. H IMG_2972.JPG
& v7 J  X  ^7 z$ R2 l* W, }7 _8 [6 ?) Z% E0 @. f+ G
IMG_2973.JPG 3 u# R0 T) b6 [( i
 楼主| 发表于 2011-10-8 08:09:09 | 显示全部楼层
小试成功,开始大规模制做。
' u5 C0 \: q  A  h  A8 }0 m1 h5 I9 ?/ T. i0 k5 g* [- O" z( G
IMG_2974.JPG 9 ?0 e- M3 r+ o: o

6 D% w# C0 G7 E7 U IMG_2975.JPG
( [: ?% _( Y3 k' b" V) j/ ]: T# y; O! A/ q
IMG_2976.JPG   M: z1 ]" f2 U9 K# X4 H( x, |
" ^" y9 y0 T- f8 w* G/ W( m
IMG_2977.JPG & l9 w7 T# m3 D( c& r$ k; n/ W
$ L8 X$ _+ G5 X, G$ u/ T
IMG_2978.JPG 6 y- Q/ s. i. T! L# I* n- V

3 e% n+ L" Y* x2 _3 ] IMG_2979.JPG
& O4 e+ h  t% L) v+ H9 G& {; [3 ?8 O7 u
IMG_2980.JPG
$ X6 R5 v) [" [2 A$ d
6 H' w1 L/ Y7 c$ f IMG_2981.JPG + G) B* D& a( J! h
您需要登录后才可以回帖 登录 | 注册

本版积分规则


快速回复 返回顶部 返回列表